Save documents to your S3 Bucket - Bubble

This feature is only available to users on a Core plan or higher. See full details on our plans here.

Upload PDF documents directly to your own Amazon S3 bucket instead of using Bubble file storage a.

This guide is designed for Bubble users who are using the Create PDF action that comes with the DocuPotion plugin.

Steps

  1. Set up your Amazon S3 bucket
  2. Connect your S3 bucket to DocuPotion
  3. Upload documents to your S3 bucket
  4. Downloading documents stored in your bucket

Set up your Amazon S3 bucket

Create bucket

  1. Go to S3 in your AWS Console and click Create bucket
  2. Choose a bucket name and region
  3. Leave all other settings as default (private access)
  4. Click Create bucket

Add CORS Configuration

This step is required so that your PDF documents can be downloaded directly in the browser via presigned URLs.
1. Open your bucket and go to the Permissions tab
2. Scroll to Cross-origin resource sharing (CORS) and click Edit
3. Paste the following configuration:
[
  {
    "AllowedHeaders": ["*"],
    "AllowedMethods": ["GET"],
    "AllowedOrigins": ["*"],
    "ExposeHeaders": [],
    "MaxAgeSeconds": 3600
  }
]

4. Click Save changes
This only allows browser-based downloads. Your files are still protected by presigned URL signatures. For tighter security, replace `"*"` in `AllowedOrigins` with your Bubble app domain (e.g. `"https://yourapp.bubbleapps.io"`).

Create an IAM User

1. Go to IAM in the AWS Console
2. Click Users then Create user
3. Name it something like `docupotion-s3-user`
4. Click Next, then Attach policies directly
5. Click Create policy and use the JSON editor:
{
  "Version": "2012-10-17",
  "Statement": [
    {
      "Effect": "Allow",
      "Action": [
        "s3:PutObject",
        "s3:GetObject"
      ],
      "Resource": "arn:aws:s3:::YOUR_BUCKET_NAME/*"
    }
  ]
}
Replace `YOUR_BUCKET_NAME` with your actual bucket name.

6. Name the policy (e.g. `docupotion-s3-access`) and create it
7. Attach the policy to the user and finish creating the user

Generate Access Keys
1. Open your new IAM user and go to the Security credentials tab
2. Click Create access key
3. Select Third-party service and confirm
4. Copy both the Access key ID and Secret access key — you'll need these in the next step

Connect Your Bucket

1. Go to the API Integration section of your DocuPotion dashboard
2. Enter the information required and click Connect bucket

DocuPotion will perform a test upload to verify your credentials work. If successful, you'll see a connected status.

Upload documents to your S3 bucket

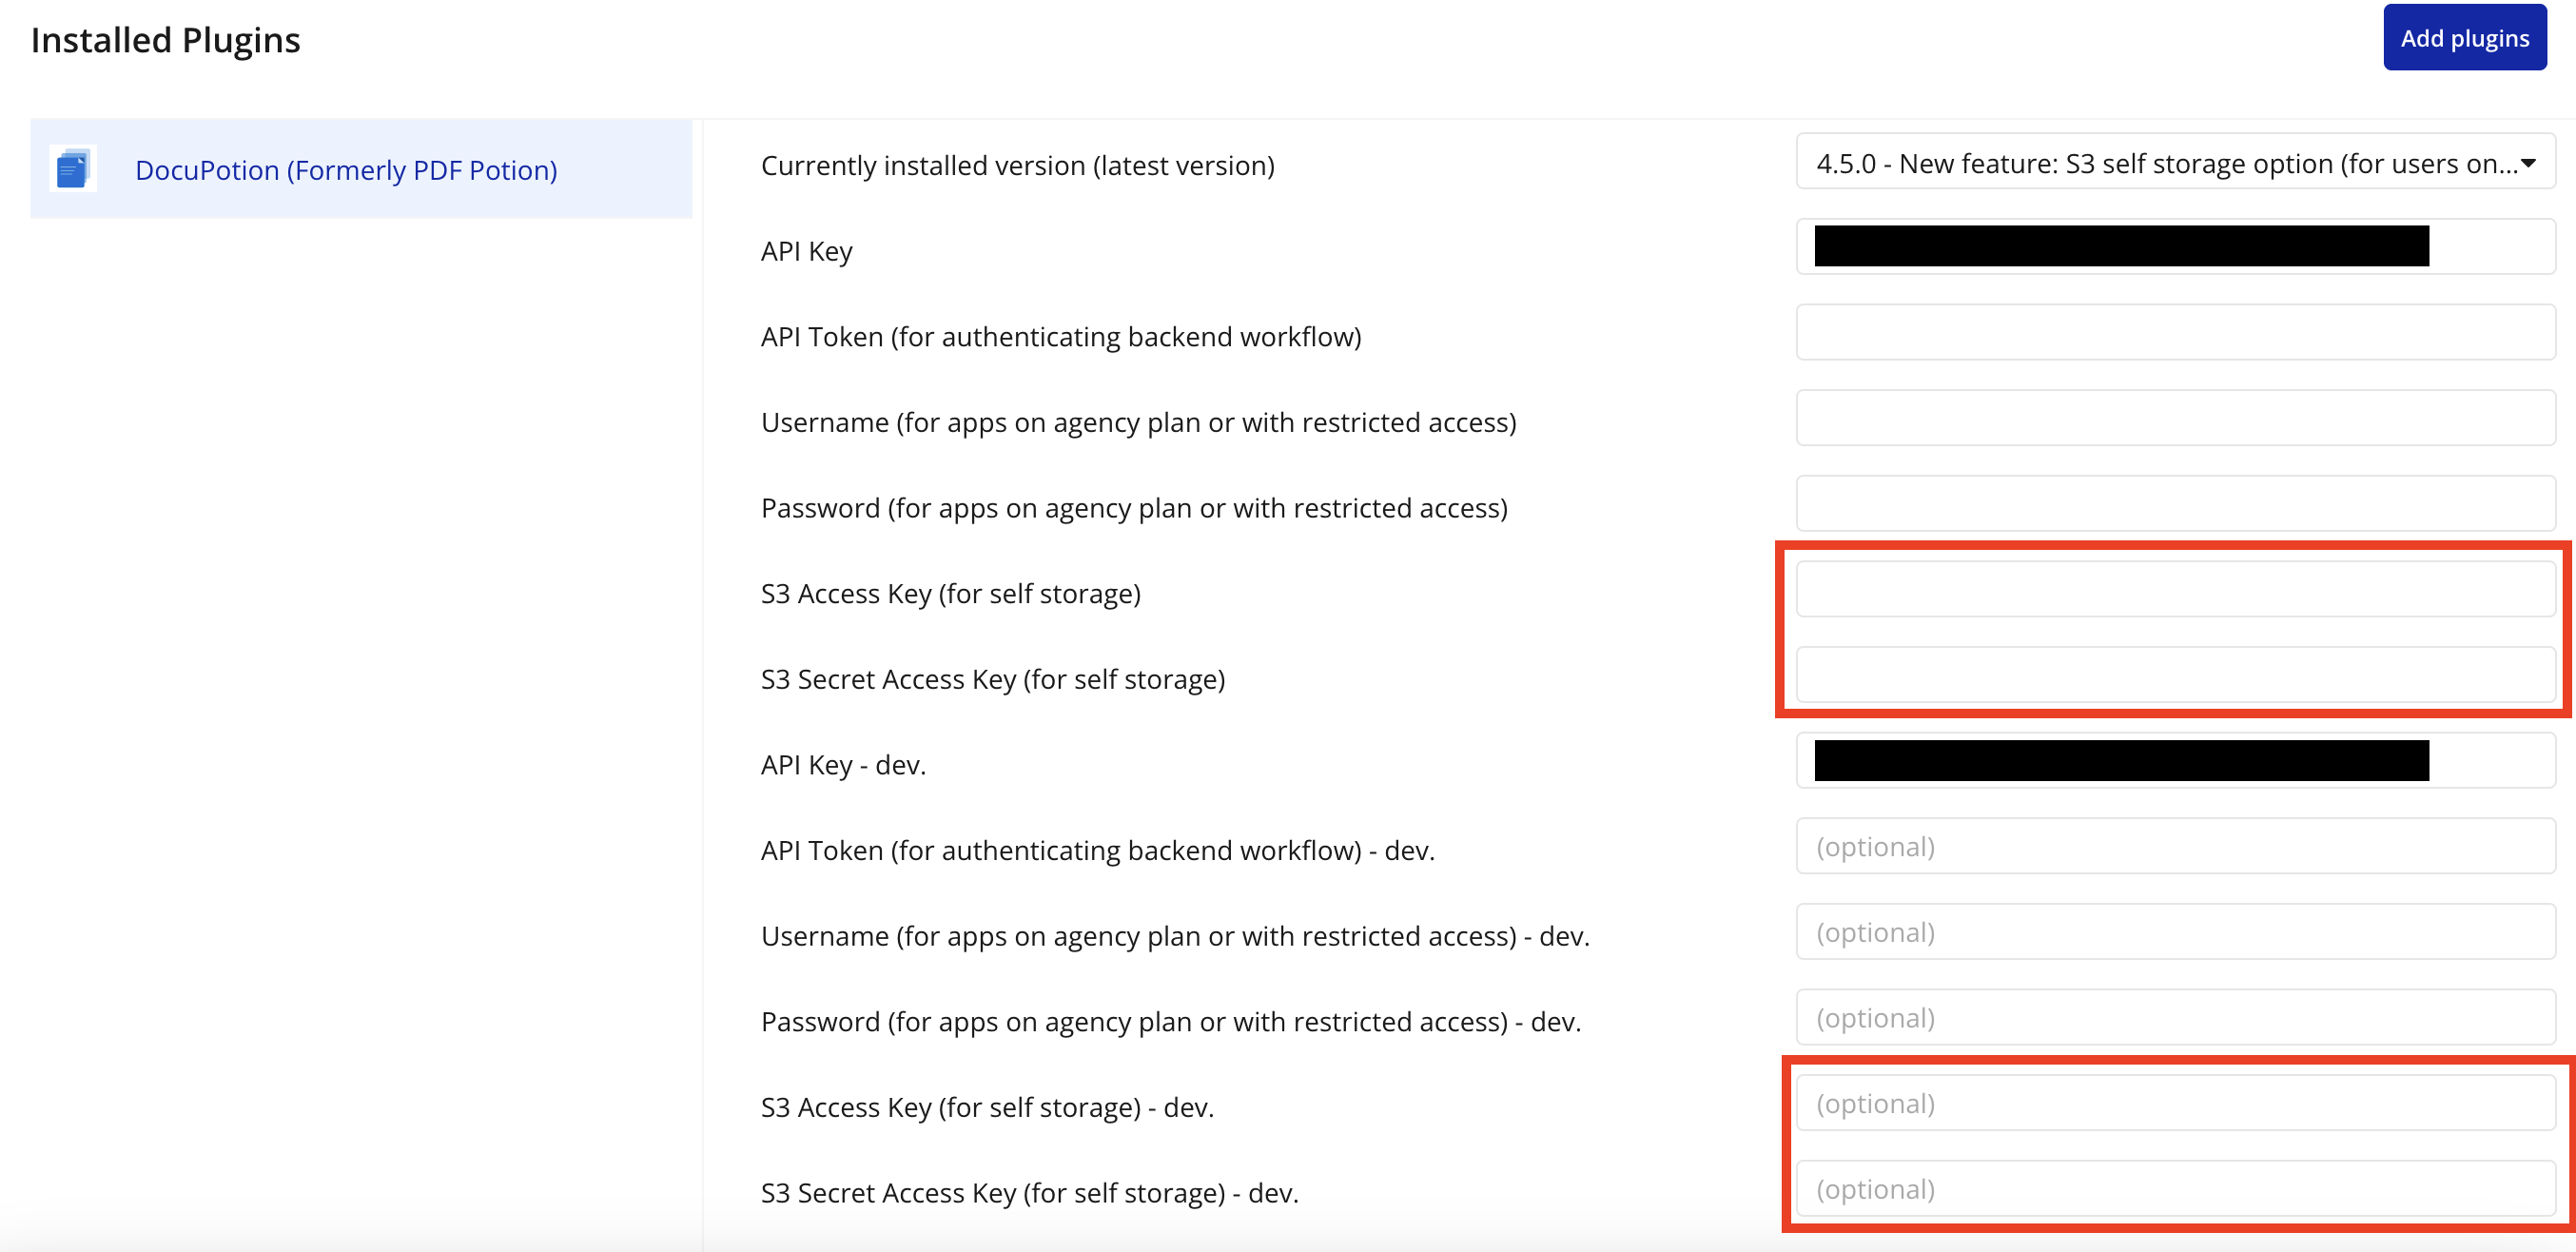
Add your Amazon credentials to the Plugins tab

Add the Access Key and Secret Access Key you generated when setting up your S3 bucket and add them to the relevant inputs in the Plugins tab:


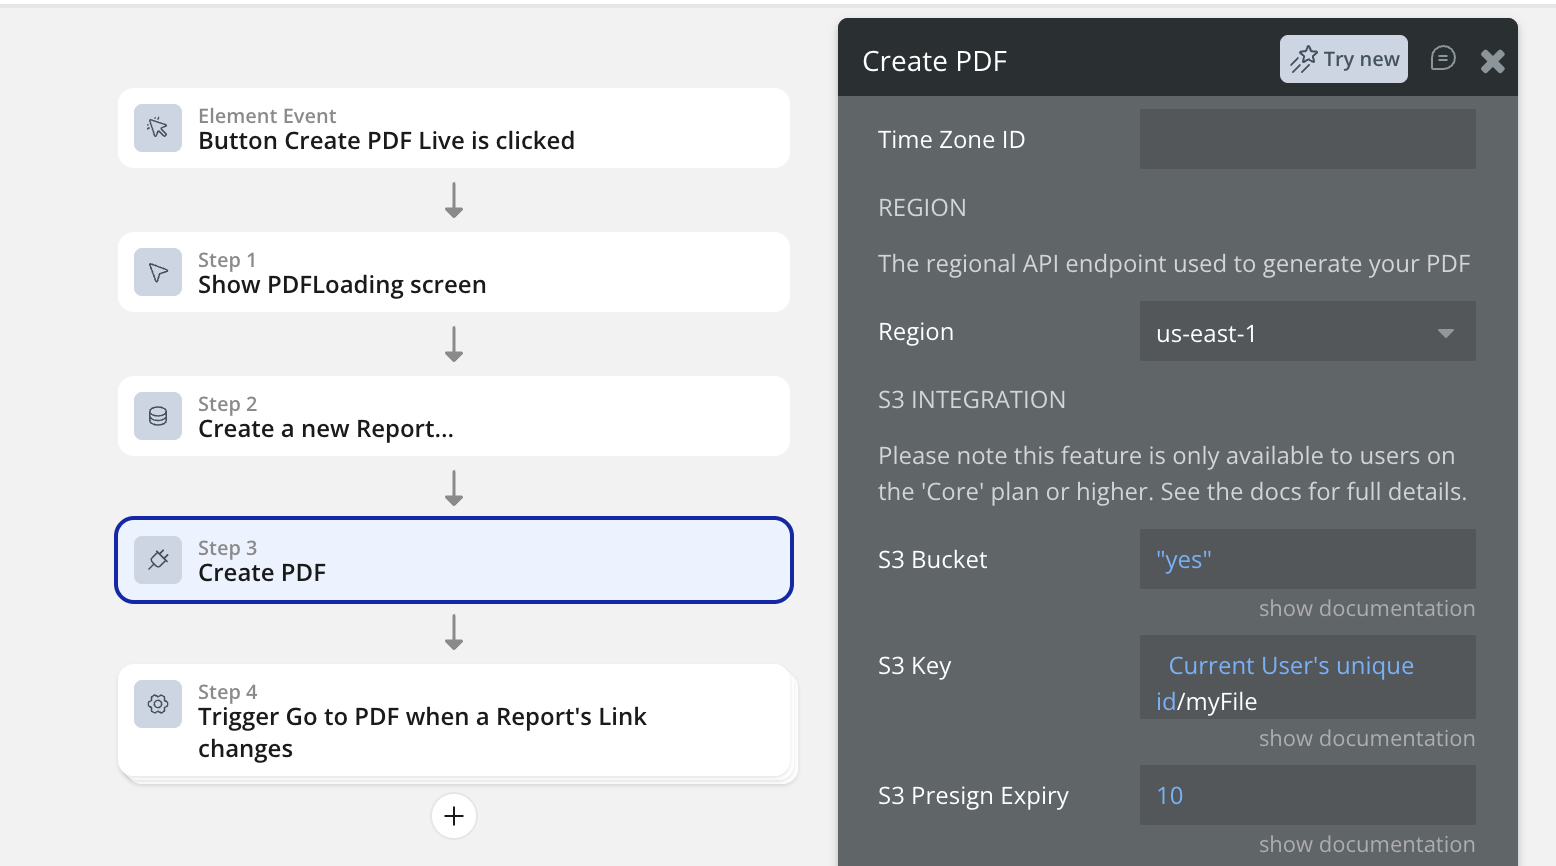
Update the Create PDF action

  • Set the S3 Bucket field to 'yes'. This tells DocuPotion to upload the generated document to your S3 bucket instead of Bubble file storage.
  • The S3 Key field is the path and file name of the document that will be saved to your S3 bucket. You do not need to add a .pdf extension (DocuPotion does this automatically)
Example: Setting S3 Key to invoices/2024/INV-001 will upload the file to invoices/2024/INV-001.pdf in your bucket.
  • The S3 Presign Expiry value represents the number of minutes before the presigned URL expires


Downloading documents stored in your bucket

If you need to generate a fresh download link for a file that's already in your bucket (for example, after the original presigned URL has expired), use the Get S3 presigned URL (download) action in the DocuPotion Bubble plugin.

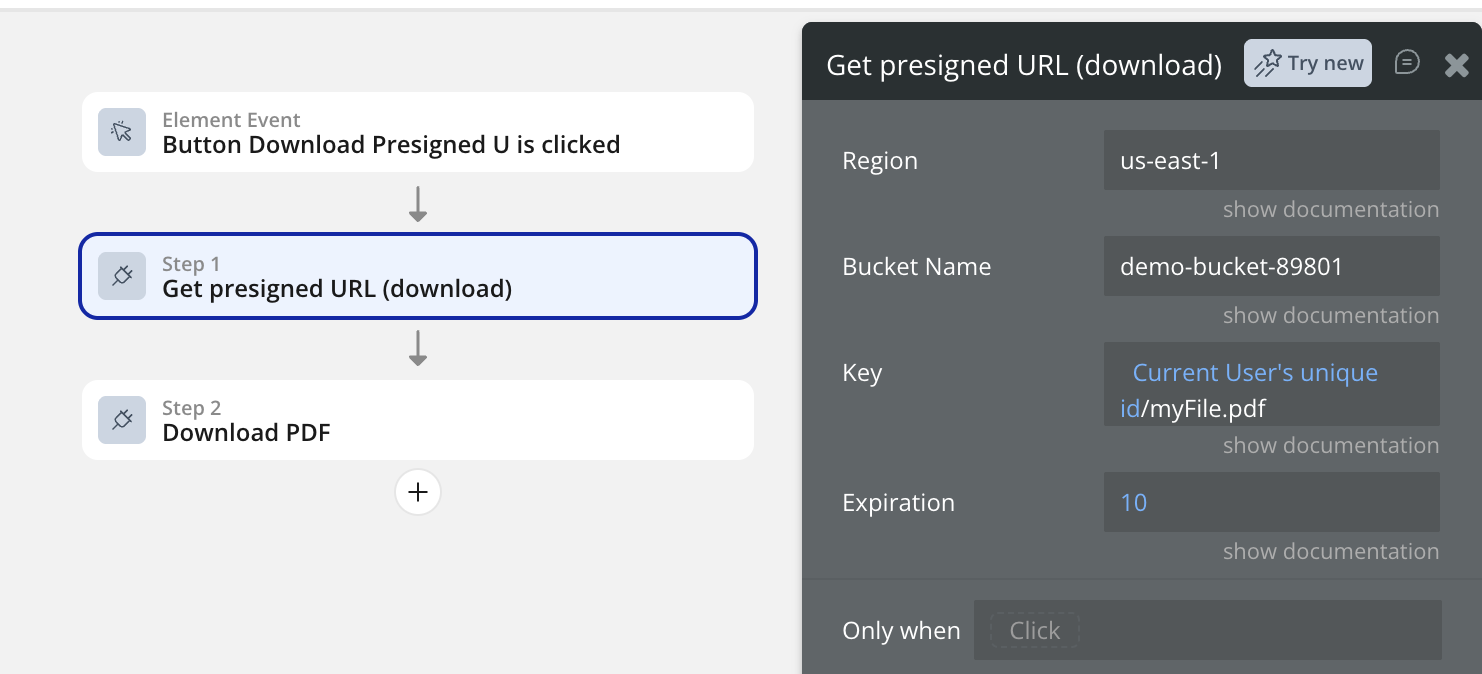
You can use the Download PDF action that comes with the DocuPotion plugin to allow the user to download the PDF document or the Open an external website Bubble action to open the link in a new tab.

Important: You will need to add the .pdf extension to the end of the Key value
Did this answer your question? Thanks for the feedback There was a problem submitting your feedback. Please try again later.